CAMP STOVES AND GRILLS
I saw a photo today of a camp stove from heaven! It is yet another use for a number 10 can.
With tin snips, cut nine or ten lines from top to about two and a half inches from the bottom.
Bend outward and line with tin foil. use charcoal to heat.
Add rack from toaster oven.
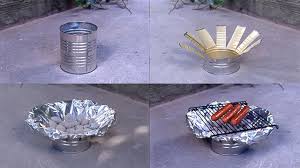 originally from www.lifehacker.com
This stove reminded me of the hobo stove my sister made when we were kids. We had whole days to play in summers and she was a crafty genius before we knew what crafting was. She took a number ten coffee and cut vent holes in it by using a bottle opener with the pointed end. There were five to seven triangular holes at the natural bottom of the can. With an old pair of shears, she cut a vent at the bottom. She used a candle stub for heat and we had fresh toast and jam for our lunch!

Yes, we were allowed to play with matches because we watched TV in black and white and we knew better than to set the yard on fire in those days. Besides, she was my BIG sis and she was nine, a very responsible age in those days. Oh, and one other thing, we didn't blab all over the internet either, so there were no DCF investigations!
I have found some other links such as this at www.motherearthnews.com. You don't have to be a hippie to appreciate the engineering of a good stove made from a can.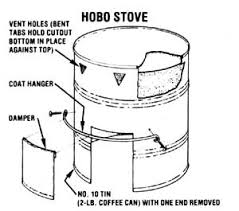 This one offers an insulated top for even heating. Cut the lid from the can and save it. Use the coffee and when done, save the plastic lid, too. Place the metal lid in the can and using a tin can opener, bend in the tabs to keep the lid suspended inside below the natural base of the can. Cut a damper vent at the bottom that used to be the top of the can. Invert the can, build a small wood fire under the can and use it as a stove. You can rest a pot like one from a mess kit. This hobo stove can be turned into a grill by turning it over, and placing the rack of a toaster over on top. when fire is out, place damper vent piece inside and fill with sticks or leaves for tinder and cover with the plastic lid to transport to next location. You can keep some cooking utensils in it and use the stove as a storage can on the go.
Try these simple and crafty ideas for your next grill or cookout. It's clever, fun and valuable knowledge and experience to add to your personal survivor skills list!
With tin snips, cut nine or ten lines from top to about two and a half inches from the bottom.
Bend outward and line with tin foil. use charcoal to heat.
Add rack from toaster oven.
This stove reminded me of the hobo stove my sister made when we were kids. We had whole days to play in summers and she was a crafty genius before we knew what crafting was. She took a number ten coffee and cut vent holes in it by using a bottle opener with the pointed end. There were five to seven triangular holes at the natural bottom of the can. With an old pair of shears, she cut a vent at the bottom. She used a candle stub for heat and we had fresh toast and jam for our lunch!

Yes, we were allowed to play with matches because we watched TV in black and white and we knew better than to set the yard on fire in those days. Besides, she was my BIG sis and she was nine, a very responsible age in those days. Oh, and one other thing, we didn't blab all over the internet either, so there were no DCF investigations!
I have found some other links such as this at www.motherearthnews.com. You don't have to be a hippie to appreciate the engineering of a good stove made from a can.
Try these simple and crafty ideas for your next grill or cookout. It's clever, fun and valuable knowledge and experience to add to your personal survivor skills list!
The Dutch Oven
To season a new pot, wash it in hot soapy water and rinse well. Thoroughly dry the pot and lid. Rub oil inside and out of the pot and the lid. coat it well. Place it in a charcoal Bar be Que grill after you are done cooking your next meal. Cover it and let it bake as the coals cool. Some people suggest turning the pot upside down, I like the on the side method with the lid propped at an angle leaning on the pot feet.
|
3872 × 2592 - Alex Neiwirth,
with his fancy delicious Dutch Oven
Pineapple Upside Down
|
|
640 × 480 - Dedicated to Promoting
the Use and Care of Cast Iron Dutch Ovens
|
POTS and PANS
FYI: the pots and pans in the average kitchen are only good for use in the average kitchen. The handles will not stand up to the direct heat of an open campfire flame. I have used the burners that screw on the top of a propane bottle while camping for years and I can state for a fact, a pot holder is needed. Even with the standard mess kit set, a pot holder or protective glove is needed around the propane stove as eventually even the handle tip will heat and burn. Safety is a huge issue for me so I want you to get in the habit of practicing before a storm or other disaster so you know from experience. My experience puts me in a good position for survival. I want you in the same position.
The propane burner stove on medium is a hotter flame than the high setting on a household gas stove. When used in the outdoors, wind can change the flow of fuel and heat one side more than another. If it is the handle side, you could be in trouble. I wouldn't leave a pan on the burner unattended in case a heat spot develops and you have molten handle!
Look through your kitchen and separate your pots and pans. Get to really know your inventory. You made lists of things you have and are possibly making lists of things you need, but also inventory the things you can leave behind if you had to evacuate your home. Maybe you will have time and you can pack your vehicle with the things you think you need. Space is precious. You don’t want to take things that you cannot use or will cause a safety issue if you do.
I remember wanting a set of those smoky glass pots and pans when they first came on the market. My sons were young so I always put off that purchase. I am glad I did. I would have to leave them behind as they too should not be used on a campfire and even a low propane burner. I would lament the waste of a dollar if I could not use them every day under any circumstances. I know myself well. I would even pout if I had to leave something behind because it was useless.
Now is the time to look through your cabinets and decide. I am not throwing away perfectly good utensils. I just want to be ready to set aside the things for which I no longer have a use. I want to know that all my dual use campfire capable, propane burner survivable cookware and utensils are in an easy access area. Now is the time to look at what you own. You may be surprised to find things you forgot. But, if you do find you have a good deal of clutter, donate it to a charity, it is almost tax time, store it for a yard sale in the spring. You could make room for more prep gear!
If you are in the market to purchase cookware, don’t forget to compare prices at the Boy Scouts of America gear website. Your purchase could help a good cause. I am not affiliated with BSA I just know a good thing when I see it.This is a blog that brings up another very fine point. When you outfit your kitchen with sturdy, wear ever, iron, you lower your carbon foot print by not cluttering up the land fill with utensils that don’t work and waste time energy and money.

This site has stopped posting but have left their blog open for exploration and education. Enjoy! simple-green-frugal-co-op.blogspot.com
Cast Iron versus Cast Aluminum
 Cast iron has been around for thousands of years where cast aluminum is an historically new invention, since aluminum cookware has only been available since 1899.
Cast iron is praised for it's even heat which makes it perfect for use over open fire, either wood or gas.
Both Cast iron and cast aluminum are now made with a coating to provide not only a non-stick surface that needs no seasoning, but also to prevent metal from leaching into the food.
 |
| www.atft.com |
 |
$59.97
|
 I have been around the web and I found a lot of good information on cookware at www.listentoyourgut.com (click on blog and search cookware) and a vote for "dead set against any ceramic utensils and coatings" at www.greenprophet.com.
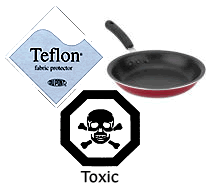
 In the kitchen, it is a crap shoot to guess if this is the chemical leaching that will kill us or teflon, or aluminum or arsenic or ....... WE now have known for some time that teflon is dangerous to ingest and it is being phased out of the market. Frankly, it isn't worth the high cost of investment in new cookware to experiment on new chemical risks, in my opinion.
Above, left is a photo of cast iron with a credit to the web page that reviews cast iron. I vote stick with what works. Learn to season a pot whether it comes coated or not. I vote....IRON!
Get rid of your old scratched teflon coated pots and pans and if you feel nanotechnology is a safe science, enjoy the very expensive pretty colored pots and pans!
Simple Solar Ovens
In any solar cooking operation you will want pots and pans prepped for solar cooking. First things first, find your solar pots and lids and spray the outside of them flat black.
When I cleaned out my cabinet last fall looking for more storage space, I came across a set of T-fal cookware I had not used since the five piece set came with ONE inter-changeable handle. ONE! It broke, but the pots and pans were still useful and I assumed I would eventually find a handle at a yard sale. Not so! I use these non-stick pots with their matching lids, strictly for solar cooking.
Once you have the pots you will use, you have the dimensions you will need for your solar oven. For example, I can not tell you how big your small sauce pot with the lid on it is, so I cannot tell you the size of oven you need. This is up to what you have or are willing to acquire.
The simplest solar oven is a cooking bag and a pot. The turkey size roasting bag will work, but only once or twice.
A Pyrex or glass salad bowl lasts till you break the bowl! Make up your recipe in a sauce pot, the darker the better the pot. Place the sauce pot on a wood, or ceramic side of a tile, not the glazed tile surface, or on a stack of newspapers, anything that will keep the pot from touching the earth and thereby leeching heat into the soil. Turn your large glass salad bowl over the pot. You may have to move the 'oven' to keep it in the sun, but beyond this, all you need are recipes and time. In the above photo you can see the dual purpose Pyrex brand glass bowl and lid used as a solar oven.
The next step up in solar ovens is the inner tube oven. Placed on a piece of plywood, the inner tube absorbs the sun's rays and insulates the pot. The magnifier is a plain piece of glass.
If after using these ovens, you feel it takes too long or there should be a way to avoid moving and re-positioning the oven AND speed the process, there is.
Next step up in solar ovens, add an amplifier! This is as easy to produce as kindergarten art. Take a box and line it with aluminum foil. Remove the top of the box. Cut the seams of the box on two corners. Lay the cut away side down. Line the three remaining upright sides on the inside with aluminum foil. Line the inside bottom and the open flat flap with foil, also. place your oven on the inside of the foil lined box and turn to the sun as it rises or sets to catch more of the sun as it moves. simple!
When I cleaned out my cabinet last fall looking for more storage space, I came across a set of T-fal cookware I had not used since the five piece set came with ONE inter-changeable handle. ONE! It broke, but the pots and pans were still useful and I assumed I would eventually find a handle at a yard sale. Not so! I use these non-stick pots with their matching lids, strictly for solar cooking.
Once you have the pots you will use, you have the dimensions you will need for your solar oven. For example, I can not tell you how big your small sauce pot with the lid on it is, so I cannot tell you the size of oven you need. This is up to what you have or are willing to acquire.
| This is a Pyrex bowl and lid inverted and the lid clipped for non-slip. The dark pan inside is from the camp cookware and works because it is dark. |
A Pyrex or glass salad bowl lasts till you break the bowl! Make up your recipe in a sauce pot, the darker the better the pot. Place the sauce pot on a wood, or ceramic side of a tile, not the glazed tile surface, or on a stack of newspapers, anything that will keep the pot from touching the earth and thereby leeching heat into the soil. Turn your large glass salad bowl over the pot. You may have to move the 'oven' to keep it in the sun, but beyond this, all you need are recipes and time. In the above photo you can see the dual purpose Pyrex brand glass bowl and lid used as a solar oven.
| nck.newsvine.com |
The next step up in solar ovens is the inner tube oven. Placed on a piece of plywood, the inner tube absorbs the sun's rays and insulates the pot. The magnifier is a plain piece of glass.
| solarcooking.org |
Next step up in solar ovens, add an amplifier! This is as easy to produce as kindergarten art. Take a box and line it with aluminum foil. Remove the top of the box. Cut the seams of the box on two corners. Lay the cut away side down. Line the three remaining upright sides on the inside with aluminum foil. Line the inside bottom and the open flat flap with foil, also. place your oven on the inside of the foil lined box and turn to the sun as it rises or sets to catch more of the sun as it moves. simple!
Alternative Fuel Cooker
 I was out yard saling today, and picked up a QWIK cook grill. It is an alternative fuel cooker that was endorsed on infomercials in the '90s by football player Dick Butkus. I suppose I should feel for the woman who never used it and sold it to me for three dollars. She had it marked $5, but I can be like that sometimes when I tilt my head and say, "welllll, I s'pose...." and then the price tumbles. Sure, I'll try it, I say and I give her three dollars.
 I don't even feel a little bad for her that I came home and checked it out on Ebay only to find others are offering their 'vintage' new in the box grills fro a price of $399.99 to $59.99 to 'buy it now'!
I will not be offering mine for sale on Ebay. I will not even let it get to be summer before I give it a try. I have some hamburger thawed in the fridge and I'm thinking the grandson and I will make burgers tomorrow. What little boy doesn't like making fire? Under supervision, we will wad up some paper according to directions, even though I think I can do it without a diagram, and we will just burn some burgers!
I already pulled the thing out of the box and it so reminds me of the cooker my sister made when we were young and unsupervised, back in the days when we were told to go outside and play, and we went. My sister's design was more simple and only a coffee can big, but I want to include this drawing as a reminder of an earlier post I made. We used dried grass and small sticks as fuel. If we had thought of newspaper, we could have opened a little rascals style restaurant!
I have looked into several energy efficient, smoke reduced cookers. It is and has always been a problem in under developed nations that the women who cook, die young from lung diseases due to a life of inhaling cook fire smoke. Who needs cigarettes to kill you when poor ventilation and an inefficient cook fire will do the job?
 |
| www.thediyworld.com |
This is a picture of a rocket stove. This stove is made of soup cans, a coffee can and cat litter. A hole is cut in the bottom of the larger coffee can side, three soup cans are used to make an L shaped tube. The cat litter, which could just as easily be substituted with dry pea gravel, is used to stabilize the tube in the can and to absorb heat as well as insulating the tube forcing the heat up to the pot and causing the gas from the wood to combust making for a hotter flame. The heated litter then maintains heat after you stop feeding the bottom with sticks or grass pellets allowing a simmer time or a stay warm time on the stove without fuel.
A little more costly to fuel than the paper burning cooker is the duel fuel cooker. This cooker allows for the use of both propane and white gas fuel. If you have any questions about the pros and cons of using this kind of stove or these fuels, please go to this site and read their reviews of various fuels and stoves. It is very informative and does not appear biased to me. http://zenstoves.net. The site www.Coleman.com offers this duel fuel cooker for $89.99. The same stove is available at www.walmart.com for $79.99, and they sell the fuel in stores as well.


 The double burner model is $98. But, as you know, I will recommend you yard sale this item and save the difference. I have purchased the double burner propane stove for $8, and for $7 on two separate occasions. They are in good working order, one looked as if the cook spilled some stew and didn't clean it immediately, the other had some water damage on the lid, easily sanded and painted with a can of barbecue grill paint to protect the metal from rust. Big deal! Black stove!
 Just for fun, and a bit of danger, (this site comes with a legal disclaimer, so don't get stupid and burn yourself!), here is a site with many alternative fuels and stoves and the how to's to make and use them,http://www.alternative-energy-source.org/. Research, experiment and DON'T burn yourself!


Things to do with a Zippered storage bag
| www.target.com |
 |
| http://www.accessoriesforfragrances.com |
Sure, we all know we can make a first aid kit, or a makeup bag with the stuff rattling around in the bottom of the average hand bag, but, maybe you hadn't thought of some of these.
Those large bags will hold basketballs, and other sporting goods. Fill the bags and hang them from the garage rafters.
Gather all the gear for a sport in one bag i.e. place the shin guards, stockings, shoes and the soccer ball in one bag. Put the hoop and basketball with the shoes in another. Don't forget to put a sachet in each shoe to keep them fresh.
Sachet: Put a couple of teaspoons of baking soda in the toe of an old sock. Tie off the top and stuff it in the shoes to be stored.
For home repair,to mend a damaged wall, put some drywall compound in a baggie. Squeeze it to the corner of the bag. Clip the corner and squeeze a bit into the crack or nail hole.
Fill a bag with ice and use it to ice a knee. To remove candle wax or gum, use the same trick. A bag filled with ice rubbed over the gum or wax will make it hard enough to scrape it away.
Take a few bags with you into the garden. Pick your vegetables right into the bags, bring them in and toss in the deep freezer.
Sort and pack those extra electronic cables in a bag.
A gallon bag will hold an 8 1/2" by 11" document, safe from the elements.
Fill with air (like a balloon) and close to use them as shipping material.
Use a recycled bag as a funnel.
Put a spoon full of soil in a bag and germinate seeds, especially the small ones. It's easier to control the planting lines when you are transplanting seedlings than chasing carrot seeds!
Organize socks, and other small items in the dresser.
Organize the jewelry box. Silver and gold shouldn't touch, anyway.
Don't forget to store food in them!
You can use them to sort spices in the kitchen, make a spice baggie with all the dehydrated onion, garlic salt and pepper etc. to make a stew, just and water, meat and vegetables. It's a sort of 'stone soup' mix!
 For another view on the subject click this link and go to Popular Mechanics to make your solar oven out of plywood and drywall and plexiglass.
Last method of solar oven.....if you have the where with all....The Sport is on sale at Emergency Essentials this March for $189 at www.beprepared.com
 Of course, we have all seen those ladies with nothing better to do all day than clip coupons and hold up the line at the grocery store. But is that really what we are seeing? I think occasionally you will luck out and get in line when you are in a hurry and anyone who slows you down gets the 'look' and a negative judgement.
Calm down and look again! I was in my local Walgreens Last weekend. I was in line behind three men. Line time for me is meditation free-time. I try to zone out, breathe slow and evenly and think about being somewhere else. But, this trip put me in line to an eye opener. All three men had coupons for their purchases and all three of the had their Walgreen's discount card.
 Coupon clipping in the past may have been the pass time of stay at home wives who were putting away a little savings for a rainy day. But today, it is a sport! These guys were talking like they were in a high school locker room. They were cheering each other on and congratulating the guy in front for the deep discount. He doubled his savings by combining a weekly store sales flyer coupon with a manufacturers coupon. Woo Whoo! When he finished his purchase, he waited to see what the next guy had in his bag of tricks. Guy number two had a buy one get one free coupon and a manufacturers coupon.
Apparently, guy number two won! He got twice as much for half the price and $1 off his vitamins! Guy number three moaned a little because his wife only gave him one coupon and the other two set him straight about how to work the scissors and paper cutting concept or stepping up to I phone coupon clicking. When they noticed me standing there with one eyebrow up and a smile, I just said, "Welcome to my world, newbies!"
I am posting this picture because the headline for this Wall Street Journal article summarizes today's post in a nutshell. Coupon clipping is no longer a dirty little secret. It is a sport. It is addictive, so be careful not to fall down that rabbit hole!
More tips for couponing:
Be sure to open a junk email account NOT connected to business to receive coupon offers. Junk mail will follow.
Be sure to sign up for sale and coupon alerts from favorite stores. GFS (bulk supply) offers a monthly $5 off coupon when purchasing 50 every month with their e sale flyer.
Be sure to file coupons by date of expiration as well as type of item. They do check those dates at the registers.
Be sure to remember charities kindly. If you have an opportunity to acquire an item you don't use or like (for free) get it and donate it immediately. Charities do not have time to shop, they are counting on you.
Coupon clipping services may send you lots of coupons, but do your own homework and save the cost of the service and possible disappointment.
Stealing your neighbors Sunday paper sales flyers is still stealing....I know this chick and,.....no!
If you get into couponing as a sport, be sportsman like. Do your shopping at NON-peak shopping hours so as to let those harried people get home with their tired little kids! Tell the person behind you in the line that you have a lot of coupons.
Just for fun, Google 'coupon clipping men' and read some of these articles. You will learn a lot of the how to from people who have tried to stretch their dollars as far as they will go! If you are a man, you will relate. If your are a mom, you will smile and say, "Welcome to my world, little buddy!"
Fire is a chemical reaction, often between different chemical compounds or elements, each which has stored energy. That is the science of it. You can study more on how combustion happens in an interactive tutorial from NOVA at www.pbs.org/wgbh/nova/physics/science-fire.html.
But for the beginner think of it this way:
To make fire, you need heat, fuel and oxygen. heat from the friction of two sticks, a match head on a striker, a piece of steel struck against a flint. Fuel is the stuff that burns. When you are making fire, you want a wad of dried moss to 'catch' the first sparks. Blowing on the smoldering sticks or moss causes the hot tinder to burst into flame. At the moment t begins to glow red, add a gentle breeze of a breathe to feed it the oxygen it needs to burn. Have more dried moss and leaves on hand to feed the little flames until you can add small sticks and more oxygen either by fanning the flames or blowing on them.That is the basic street explanation that can be argued but not disproven.
Allow me to share some step by step visuals.
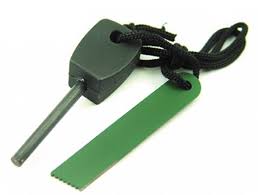 Don't leave home without one. These are the greatest thing since the invention of the disposable lighter to have on you when you want to make fire. They come in many shapes, weigh next to nothing in the bug out bag and can be found in the camping aisle at Wal Mart or online in any sporting goods store or survival store for $5 - $9 depending on the carry case that comes with it.
 When I was learning to read, I was allowed to help out in the kitchen by reading the instructions on packages and recipes to my mom or Grandmother. I remember the vivid colors on the box of the first Betty Crocker Cake mix. I also remember reading the amount of water needed to make it come to life. At age six I could not believe my grandmother took a dirty cup full of cloudy liquid to the sink and added more water to it then she poured it right into the bowl!
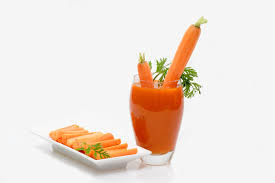 She saw the look on my face and told me to calm down. She had steamed carrots for dinner and set them aside in the warming oven. She then poured the liquid which was just water and carrot juice into the measuring cup. She waited until we needed it it and added the water needed for the cake recipe. We called that watery soupy stuff, pot liquor.
So, we had carrot flavored cake, I thought. No. We had cake. You couldn't taste carrots in it. I still thought Gram was a little tipsy or maybe a it silly. Who wants carrot juice in cake? Well, I do.
Since that traumatic Sunday dinner, I found my mother draining the fruit cocktail into a measuring cup when she made her fruit cocktail upside down cake. Putting the juice of the pineapple back into the cake of pineapple upside down cake makes the neighbor lady a little jealous of your moist cake.
As a prepper, sure you may think it is a habit of waste not, want not. It is. But, more than that it is putting whatever nutrition you can back into the food you eat. Of course this trick is healthier for you when you are not using store bought canned produce. When canning your own fruits and vegetables, you will begin to use less sugar than the stuff on the market, and you will not be adding preservatives.
You may think this is a very good idea for the use of sweet fruits, as the pouring of peach preserve juices over cereal is a real treat. But, with few exceptions like pickled eggs, the brine or juices of the veggies you have canned can also be used in cooking or baking as well as a flavorful vegetable juice mix. Anybody ever heard of V-8? You can hide a world of vegetable flavors ion any tomato based drink, soup or sauce.
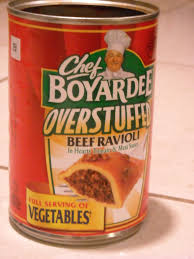 Lately, in the pursuit of customers looking for a healthy quick food for their kids, Chef-Boy-Ardee has added a full serving of vegetables to each can of their tomato based canned foods. Who wants to bet it's cauliflower? Cauliflower steams up quick, mashes into a puree and disappears into stews as a thickener and into cookies as a way to get veg into kids! Jessica Seinfeld couldn't get her kids to eat vegetables without a whine fest, so she hides them in cookies, cakes and fun food. you absolutely cannot taste the cauliflower in mac and cheese and the apple sauce in cookies make them chewy.
Even if you are past the stage of getting your kids to eat better and stop fighting the healthy stuff, you can benefit from adding the fruit and vegetable juices that go down most sink drains back into your diet.
My kids are all in their thirties and they still don't know why they can't get food 'like at home' from the restaurants. They don't know that Prince of Wales cake contains all of an apple except the seeds. They don't know that their burritos had beef calves liver in them, that the Welsh meatballs were actually liver and every cake they ever ate either had fruit juice or the pour off from the green beans in it. They didn't need to know, then. Oh, yeah, I never liked pumpkin pie all that much, so most of the pumpkin pies they ate were sweet potato and a small white potato to lighten the color. Sorry, guys. One time it was yellow squash and a sweet potato. Yeah, I am THAT kind of mom! Happy Mother's Day! You didn't die.
Now, I want the world to know. You can pour the pot liquor back into the potatoes when you mash them. It is also great for soup thickening. The next time you bake apples for dessert, wrap a couple extra in aluminum foil. Mash them into cakes and cookies, or throw their delicious vitamin C into the meatloaf or chili. Use the pot liquor. Enjoy
MORE SOLAR OVEN HOW TO
The next step up is the box in a box with a reflector flap and a clear window. This cooker just sounds complicated but since it uses glue and aluminum foil, cardboard boxes and a little spray paint, it is just kindergarten art on steroids!
 |
| cardboard box |
|
| 2nd smaller box |
|
| piece of cardboard |
|
| amplifier |
First, paint the inside of the smaller box and your small piece of cardboard black, and check your pots, if they need painting, do that now and let it all dry. Place small box on top of closed big box and trace the box onto the lid, set aside. Cut away the rectangle made by the tracing. Open the box and glue aluminum to all the sides, inside. This is a good time to practice lining. This first box won’t look great, but you will get better and no one will see this part. Fold down the remainder of the top flaps and glue in place. You may need to use a clothes pin to clamp the flaps till the glue dries.
Now that you are good at lining, fold the flaps down and line the entire inside of the small box with foil. Make it smooth and keep the glue off the surface. Place the small black painted cardboard into the small box as a drip pan. You now have the insulator and the oven complete.
Next, make the removable lid/ reflector/ glazed frame. Lay the large piece of cardboard down on the ground; trace the large bow onto it leaving a two to three inch border. Place the small box on the same piece of cardboard and WITH the ridges running side to side, trace the small box onto the cardboard. Set aside boxes. The flaps are made by cutting from the outside edge to the mark of the big box, fold and overlap the corners and staple them or glue and clamp until dry. This creates a removable lid for the cooker. Now, make sure ridges of cardboard are running side to side and cut a flap by only cutting along the two sides and front of the cardboard. This creates the flap. Line the inside of the flap with foil. This creates the reflector. Turn the piece over and glue a glazing material to the inside.
The glazing material can be plexiglass or the glass from an old picture frame or an oven roasting bag (turkey size. Glue open end shut then glue to lid frame).
To finish, crumple news paper to keep the small box off the big box, about an inch off the bottom. Place pots of food in small box. Put lid on box and lift flap. Prop flap up with pencil or dowel. TAA DAA!
For more step by step instructions with pictures go to www.ehow.com
 For another view on the subject click this link and go to Popular Mechanics to make your solar oven out of plywood and drywall and plexiglass.
http://www.popularmechanics.com/home/how-to-plans/woodworking/who-needs-a-grill-build-a-hot-box-solar-oven
Last method of solar oven.....if you have the where with all....The Sport is on sale at Emergency Essentials this March
for $189 at www.beprepared.comStretching the Food Dollar
Calm down and look again! I was in my local Walgreens Last weekend. I was in line behind three men. Line time for me is meditation free-time. I try to zone out, breathe slow and evenly and think about being somewhere else. But, this trip put me in line to an eye opener. All three men had coupons for their purchases and all three of the had their Walgreen's discount card.
 Coupon clipping in the past may have been the pass time of stay at home wives who were putting away a little savings for a rainy day. But today, it is a sport! These guys were talking like they were in a high school locker room. They were cheering each other on and congratulating the guy in front for the deep discount. He doubled his savings by combining a weekly store sales flyer coupon with a manufacturers coupon. Woo Whoo! When he finished his purchase, he waited to see what the next guy had in his bag of tricks. Guy number two had a buy one get one free coupon and a manufacturers coupon.
 Apparently, guy number two won! He got twice as much for half the price and $1 off his vitamins! Guy number three moaned a little because his wife only gave him one coupon and the other two set him straight about how to work the scissors and paper cutting concept or stepping up to I phone coupon clicking. When they noticed me standing there with one eyebrow up and a smile, I just said, "Welcome to my world, newbies!"
![[Extreme]](https://lh3.googleusercontent.com/blogger_img_proxy/AEn0k_ujT98cvN8QWsTJkUtKQa9POGtCKOOvxuIaEtHPFlNoydxIESzx2UQaJmFiYHtxm_BD7TcNpcsDLDRIhbDuq59FC42pvdi2WT7ha8ocKBZ7ZLMmPZz52bSiN4gR4N21pVZgITI8IG7yqKmuYlM14Ib3jg=s0-d) |
http://online.wsj.com/article/SB10001424052748703615904575053413229901660.htmlHard Times Turn Coupon Clipping Into the Newest Extreme Sport |
More tips for couponing:
Be sure to open a junk email account NOT connected to business to receive coupon offers. Junk mail will follow.
Be sure to sign up for sale and coupon alerts from favorite stores. GFS (bulk supply) offers a monthly $5 off coupon when purchasing 50 every month with their e sale flyer.
Be sure to file coupons by date of expiration as well as type of item. They do check those dates at the registers.
Be sure to remember charities kindly. If you have an opportunity to acquire an item you don't use or like (for free) get it and donate it immediately. Charities do not have time to shop, they are counting on you.
Coupon clipping services may send you lots of coupons, but do your own homework and save the cost of the service and possible disappointment.
Stealing your neighbors Sunday paper sales flyers is still stealing....I know this chick and,.....no!
If you get into couponing as a sport, be sportsman like. Do your shopping at NON-peak shopping hours so as to let those harried people get home with their tired little kids! Tell the person behind you in the line that you have a lot of coupons.
Just for fun, Google 'coupon clipping men' and read some of these articles. You will learn a lot of the how to from people who have tried to stretch their dollars as far as they will go! If you are a man, you will relate. If your are a mom, you will smile and say, "Welcome to my world, little buddy!"
How to Make Fire
Fire is a chemical reaction, often between different chemical compounds or elements, each which has stored energy. That is the science of it. You can study more on how combustion happens in an interactive tutorial from NOVA at www.pbs.org/wgbh/nova/physics/science-fire.html.
But for the beginner think of it this way:
To make fire, you need heat, fuel and oxygen. heat from the friction of two sticks, a match head on a striker, a piece of steel struck against a flint. Fuel is the stuff that burns. When you are making fire, you want a wad of dried moss to 'catch' the first sparks. Blowing on the smoldering sticks or moss causes the hot tinder to burst into flame. At the moment t begins to glow red, add a gentle breeze of a breathe to feed it the oxygen it needs to burn. Have more dried moss and leaves on hand to feed the little flames until you can add small sticks and more oxygen either by fanning the flames or blowing on them.That is the basic street explanation that can be argued but not disproven.
| www.fieldandstream.com |
This is the stick method:
You spin the friction making stick back and forth with the dried leaves under the point of friction at the bottom. There are easier ways but this will work.
The bow drill:
 |
| urbanapocalypsenow.wordpress.com |
| www.survival.org.au |
This is a little more complicated, in that you must gather some pieces of wood and twine together in one place, but this bow drill method beats rubbing a stick around and around in your hands.
 |
| http://www.fieldandstream.com |
The Fire Plough
The one stick method allows that you rub a stick into a groove in a dried branch or board. surprisingly a palm frond makes a great friction board for this method. It also provides some very fine hairy fibers that will spark quickly as you rub the pointed stick into the branch. Have more dried fibers on hand, they burn quickly.
The magnifying glass method.
 |
| www.wikihow.com |
The magnifier is held at an angle to the sun until the light becomes a pinpoint on the dried moss, paper or leaves.
Flint and Steel
| www.survivalandsafetyschool.co.uk |
| www.survivalschool.com |
After you have acquired a piece of steel an any number of shapes or sizes and a piece of flint (a rock) you can make your own fire starter kit in an old Altoids can. Strike the steel against the flint to make sparks over the dried straw or moss, blow and and add fuel.
Magnesium Fire Striker
To bring Fire making to a close I want to share something I have never seen before but will be trying this weekend!
The Coke and chocolate method !!!!????? Yes, this guy polishes the bottom of a soda can with the chocolate to make a very shiny parabolic mirror.
 |
| http://trailmeister.com/tips/fire.html |
Pot Liquor
 When I was learning to read, I was allowed to help out in the kitchen by reading the instructions on packages and recipes to my mom or Grandmother. I remember the vivid colors on the box of the first Betty Crocker Cake mix. I also remember reading the amount of water needed to make it come to life. At age six I could not believe my grandmother took a dirty cup full of cloudy liquid to the sink and added more water to it then she poured it right into the bowl!
 So, we had carrot flavored cake, I thought. No. We had cake. You couldn't taste carrots in it. I still thought Gram was a little tipsy or maybe a it silly. Who wants carrot juice in cake? Well, I do.
Since that traumatic Sunday dinner, I found my mother draining the fruit cocktail into a measuring cup when she made her fruit cocktail upside down cake. Putting the juice of the pineapple back into the cake of pineapple upside down cake makes the neighbor lady a little jealous of your moist cake.
 |
| thepreservesonlinewall.blogspot.com |
You may think this is a very good idea for the use of sweet fruits, as the pouring of peach preserve juices over cereal is a real treat. But, with few exceptions like pickled eggs, the brine or juices of the veggies you have canned can also be used in cooking or baking as well as a flavorful vegetable juice mix. Anybody ever heard of V-8? You can hide a world of vegetable flavors ion any tomato based drink, soup or sauce.
| www.amazon.com |
Even if you are past the stage of getting your kids to eat better and stop fighting the healthy stuff, you can benefit from adding the fruit and vegetable juices that go down most sink drains back into your diet.
My kids are all in their thirties and they still don't know why they can't get food 'like at home' from the restaurants. They don't know that Prince of Wales cake contains all of an apple except the seeds. They don't know that their burritos had beef calves liver in them, that the Welsh meatballs were actually liver and every cake they ever ate either had fruit juice or the pour off from the green beans in it. They didn't need to know, then. Oh, yeah, I never liked pumpkin pie all that much, so most of the pumpkin pies they ate were sweet potato and a small white potato to lighten the color. Sorry, guys. One time it was yellow squash and a sweet potato. Yeah, I am THAT kind of mom! Happy Mother's Day! You didn't die.
Now, I want the world to know. You can pour the pot liquor back into the potatoes when you mash them. It is also great for soup thickening. The next time you bake apples for dessert, wrap a couple extra in aluminum foil. Mash them into cakes and cookies, or throw their delicious vitamin C into the meatloaf or chili. Use the pot liquor. Enjoy
No comments:
Post a Comment